Measure Your World
Overview
This project encompassed everything to do with measurement. from the Pythagorean theorem to the volume of 3d objects. We began with simple measurements of distance, and learned how to find distance using triangles and the Pythagorean theorem. Because the pythagorean theorem relates two distances to a third with the equation a^2+b^2=c^2, we can use it to find the measurement between any two points by drawing a triangle with corners at each point. We can adjust the pythagorean theorem to work better with this by making a and b the distances between the x and y coordinates of the points. This gives us the distance formula of d = sqrt((x-x1)^2 + (y-y1)^2). From the distance formula we started exploring what a shape would look like if all parts had the same distance to the center point (spoiler alert: it's a circle). Because a circle always has the same radial distance to all of it's points, we explored the relationship between points on the x or y axis, their intersection with the radial lines, and the angles they share. This exploration led us to definitions of the Sine (the ratio between the opposite and hypotenuse sides of a triangle) and Cosine (the ratio between the opposite and hypotenuse sides of a triangle) functions, To make the math easier we set the radius of the circle to 1 unit so that we wouldn't have to divide the x or y values by anything. This 1 unit radius gives the shape it's name: the Unit Circle.
Once we started using the unit circle, we used it as a jumping off point to visually prove that the tangent line (the perpendicular line from the end of a radial line) of an angle was equal to the sine divided by the cosine. We also spent time figuring out what the sine, cosine, and tangents are for 30,60, and 45 degree angles. To do this we used the unit circle to draw triangles with those angles, then we used the knowledge that the 45 triangle had two equal sides to find the length of those sides (1/sqrt(2)). To solve the 30 and 60 triangles, we put two together to great and equilateral triangle, found the side lengths of that (all 1's) and cut it in half again to find the sides of 1/2, and sqrt(3)/2, To prepare for the SAT, we also learned about radians (there are 2pi radians in a circle) as a form of angle measurement. To wrap up the trigonometry portion of this project. we learned about the British's triangulation method of mapping areas and used triangulation to find the position of mount Everest. This part of the project was open ended, but I solved it by splitting the triangle into two right triangles and solving for those.
After the Trigonometry portion of the project, we started developing equations for polygons. We started simply by finding the equation for the maximum area of a four sided polygon (aka the area of a square). We then used trigonometry to find the area of an equilateral and isosceles triangles, and proceeded to generalize from there. By splitting regular polygons into isosceles triangles facing inwards, we were able to develop formulas for the areas of regular pentagons, hexagons, and eventually n-gons where p was the perimeter and s was the number of sides (A = p/2 * tan(180/s). We then generalized into the 3rd dimension, and found the equation for a regular prism (the area of it's base * hight), and a cylinder (same thing, but instead of a polygon it's a circle). We ended the project by using this knowledge to find the area of several interesting 3d shapes such as cylindrical frames and frustums (pyramids with the tops cut off).
Design Your own Project (DYOP)
|
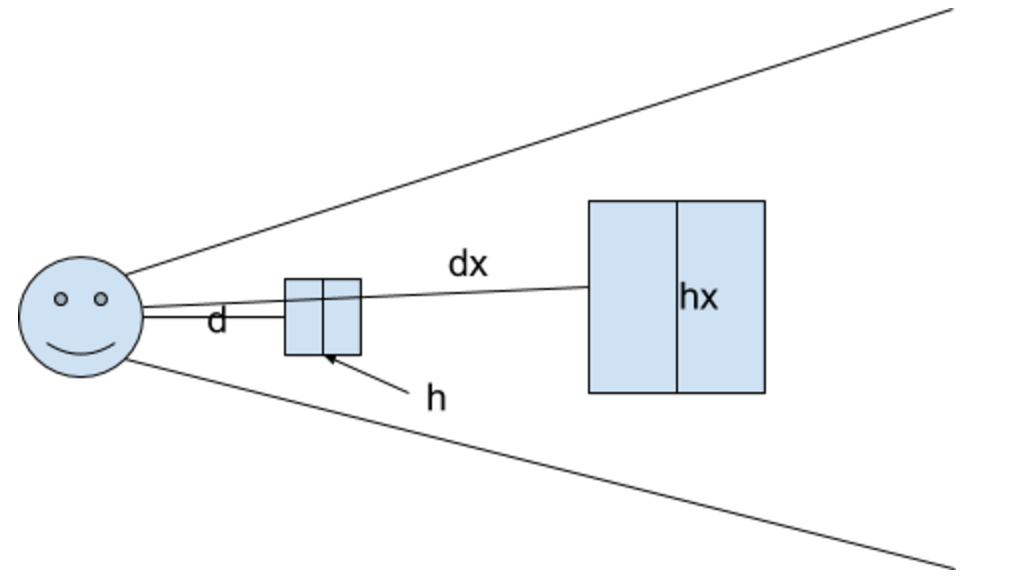
The final part of this project was to create our own mini projects. The idea was to measure some object around you, but I thought I'd try something different. I had recently seen a video game with an interesting mechanic: When you picked up an object it would be pushed so that it's location coincided with the object you were currently looking at. However, the objects size would also scale so that it never looked like the object had moved farther away. This created an interesting illusion that I thought would be fun to recreate.
The basic Idea is to make the object you pick up take up the same area on the screen, the math required to do this is best explained visually, so I put a picture to the right of this text block. |
|
Because the view lines are linear, the scale of the object should be linearly proportional with its distance to the player. When an object is first selected its scale and distance will be recorded. While the object is held the distance from the player to the point behind the object will be recorded and used to scale the distance and scale of the object, I used this code to do the math.

The main math takes place in the red boxes, it's essentially the same thing I described above.
I've put some screen shots from the game below. To help illustrate what's going on, I'm also showing the perspective of the screen camera (the picture to the left). Unfortunately, the illusion only really works with motion, so screen shots of the game don't really show what's going on. You're really just going to have to take my word that it's cool.
I've put some screen shots from the game below. To help illustrate what's going on, I'm also showing the perspective of the screen camera (the picture to the left). Unfortunately, the illusion only really works with motion, so screen shots of the game don't really show what's going on. You're really just going to have to take my word that it's cool.
If I were to do this project again, I probably would have spent more time figuring out a way to turn off a lot of the built in systems Unity uses that were getting in my way. I solved these problems temporarily by setting physics values very low, but you can still see objects clipping through the ground when you move them around. I didn't think these issues would be hard to solve, so I didn't try for a while. If I had known they would be as difficult as they were, I would've spent more time on them. Furthermore, while presenting to the class the projector kept cutting out, so it would have been great if I could have found a solution to that problem.
Overall Reflection
This project was a very good example of taking things apart and putting them back together, not only in our solutions to many of the problems, but also with regards to the project itself. It was really cool how we started with something as basic as the distance formula, and built equations on top of each other until we got to 3d shapes. Overall I think this project taught me the most about geometry. I already knew a lot of the trigonometry we learned going into this project, but most of the polygon geometry was new to me. It was a fun challenge to figure out a generalized equation for the area of regular polygons, and it was satisfying to finally figure it out. Figuring out the various 3d shapes was fun for similar reasons, I especially liked the proofs we used for the area of a circle. The DYOP portion of this section was also very interesting, and I'm proud of how my project turned out. Above all I think the one thing that I'm still curious about is the naming conventions of 3d objects. Certain shapes like prisms seem to have defined naming conventions (the name of the polygon + prism), but I can't figure out if the more complex shapes have conventions, or if people just come up with names on a case-by-case basis. If there is a convention I would be interested in learning what it is; if there isn't a convention, there should be.
