Scaling Your World
Project Description
In this project we learned about dilation, similarity, and proportions on a 2D plain. To practice these concepts, we did a lot of similar triangle math and wrapped up our project by building a scaled model of something in our world. We were given a lot of freedom in deciding what to scale, and what to build our scale model out of. I've always wanted a Godzilla action figure, so I decided to scale down the "legendary" (2014) Godzilla's proportions so I could 3D print a model of him using an Afina 3D printer.
Mathematical Concepts
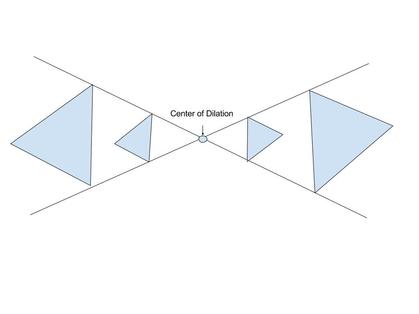
There were 6 main mathematical concepts we covered in this project: Congruence and Triangle Congruence defines two shapes a congruent if every side and every angle is equal. Due to how a triangle's sides and angle affect each-other, you can determine if two triangles are congruent using only 3 values from each triangle (unless you have 3 sides or two sides with an un-shared angle). Two shapes are described as similar if they are the same shape, but not the same size. Ratios and Proportions are used to relate two similar shapes by saying how large one shape is in comparison to another. For example you could describe two triangles as having a ratio of 3:4 if both triangles were similar and you could get the sides of one triangle by dividing the sides of the other triangle by 3, then multiplying by 4. Similarity can be proved by comparing two shapes angles: if the angles are the same, then the shapes are similar. Dilation is another way of talking about similar shapes, and a scale factor is used to relate dilated objects, so that multiplying every side of the original shape by the scale factor will give you the dilated version of that shape. This means that, if the scale factor is a negative number, the shape can be reflected with respect to the center of dilation (The center of dilation is defined as the space the shape would be if the scale factor was 0)
Dilation affects on the length of sides and the area of shapes can be given in simple equation. For a scale factor of K, the relation between two sides can be described as NewSide = K * OldSide (This should be obvious, because that's how we defined scale factors to begin with). The relation between two areas of dilated shapes can be described as NewSide = K^2 * OldSide)
Exhibition
To help us keep track of / manage our time, we were given benchmarks that we had to meet by certain points in time. The first benchmark was simple: we just had to decide what we were going to scale. There were some suggestions (you probably shouldn't try to scale and atom unless you have a really big backyard), we were still able to pick basically anything we wanted. Admittedly, I had a shallow reason behind my choice. I've always wanted a Godzilla action figure, so I figured I'd take thins opportunity to make one myself. I choose the 2014 edition version of Godzilla because, frankly, I think he looks the coolest.
The next benchmark was to do the math required to scale Godzilla to a reasonable size. I wanted to 3d print my Godzilla, so the dimensions I had were very clear. Unfortunately, the only information on the 2014 Godzilla's size I could find was that he was 350ft tall and his tail was 550ft long. I had to do the rest of the measurements myself by pasting rectangles into an image, and using them as measurement devices, which took a very long time but was worth it in the long run. After I finished measuring, I divided the height of the 3d printer (5in) by the height of Godzilla (4200in) to get a scale factor (0.00119). Then I multiplied all the measurements I had to get the new measurements I would use for my model. For example, Godzilla's larges scale (300in) became
(300in * 0.00119 = 0.375in).
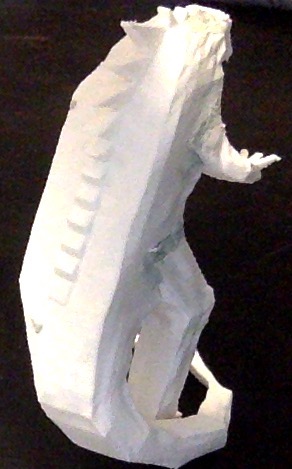
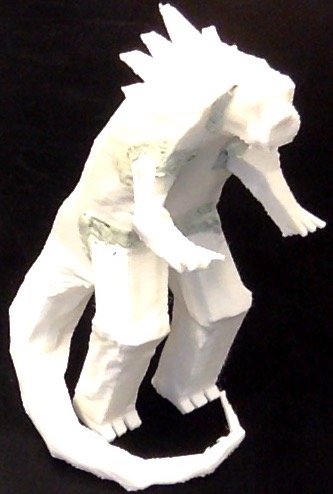
The third benchmark was to actually make the model. I used a modeling program called blender to create the model, then printed it out. The print took four and a half hours, and after it was finished I had to cut away the excess scaffolding to show the model. Unfortunately, something went wrong with the print and the parts where the limbs connected to the main body connected weren't printed, I had fill those areas in with putty so that the model would stay together. Below is a Picture of the final product.
The next benchmark was to do the math required to scale Godzilla to a reasonable size. I wanted to 3d print my Godzilla, so the dimensions I had were very clear. Unfortunately, the only information on the 2014 Godzilla's size I could find was that he was 350ft tall and his tail was 550ft long. I had to do the rest of the measurements myself by pasting rectangles into an image, and using them as measurement devices, which took a very long time but was worth it in the long run. After I finished measuring, I divided the height of the 3d printer (5in) by the height of Godzilla (4200in) to get a scale factor (0.00119). Then I multiplied all the measurements I had to get the new measurements I would use for my model. For example, Godzilla's larges scale (300in) became
(300in * 0.00119 = 0.375in).
The third benchmark was to actually make the model. I used a modeling program called blender to create the model, then printed it out. The print took four and a half hours, and after it was finished I had to cut away the excess scaffolding to show the model. Unfortunately, something went wrong with the print and the parts where the limbs connected to the main body connected weren't printed, I had fill those areas in with putty so that the model would stay together. Below is a Picture of the final product.
|

|
|
While that was the product I had set out to make, I realized that, now that I had a model, I could do a lot of other stuff with it. To give a better representation of how gargantuan Godzilla is, I imported the model into a game engine and made the model 350 units tall, I then made a player module 5.8 units tall, and took some screenshots to show how tall g]Godzilla would look if you were on the ground looking up at him (and also if you were looking at his toe, or standing on his arm looking up, or standing on his arm looking down).
Reflection
Overall I think this project was a success. The two biggest challenges were modeling and the print itself, but based on how the final product looks I think both turned out successfully, although I would've preferred if the print hadn't gone wrong. My current guess is that some part of the model wasn't defined, and it caused the printer to get confused, so I'll try to be more careful next time. This project caused me to grow in my ability to be persistent. For the first couple of drafts of the model I tried to find ways to speed up or rush the process, but every time I would get some bit of math wrong and the result wouldn't be what I wanted. Eventually I decided to take my time and check every measurement I used several times. It took about two hours, but I was happy with the result. One area I need to improve on is starting small: While I was able to fix the print, the fact that something went wrong shows that I didn't have the best idea what I was doing. It's not hard for me to think of a situation where things went wrong. I probably should've done a test print of another, simpler, model to make sure that everything was working before attempting to print the actual model.
